Introduction
Parents everywhere are constantly on the lookout for ways to save money and reduce their environmental impact. One area where both of these goals can be achieved is in the realm of diapering. Enter the world of DIY cloth diapers! By creating your own reusable diapers, you’ll not only be making a positive impact on the planet but also your wallet. In this article, we’ll explore the ins and outs of DIY cloth diapering, including materials, patterns, and sewing techniques to get you started on your journey toward a more sustainable and budget-friendly diapering experience.
Materials and Tools You’ll Need
Before you begin, gather the necessary materials and tools for your DIY cloth diaper project:
- Fabric: Cotton, flannel, or hemp are popular choices for the diaper’s outer layer, while a more absorbent fabric like microfiber, bamboo, or hemp is needed for the inner layer.
- Waterproof material: PUL (polyurethane laminate) or TPU (thermoplastic polyurethane) fabric works well for a waterproof barrier.
- Elastic: For a snug and secure fit around the legs and waist.
- Hook and loop or snaps: For adjustable closures.
- Sewing machine and basic sewing supplies: Thread, scissors, pins, and measuring tape.
- Diaper pattern: Choose from a variety of free or paid patterns available online or create your own custom pattern.
Selecting and Preparing Your Pattern
- Choose a pattern: Browse through various DIY cloth diaper patterns online, or create your own based on your baby’s measurements. Consider factors such as size, adjustability, and ease of use when selecting a pattern.
- Pre-wash the fabric: Before you start sewing, pre-wash your fabric to prevent shrinkage and remove any residue.
- Cut out the pattern pieces: Follow the pattern’s instructions to cut out the necessary pieces from your fabric, waterproof material, and elastic.
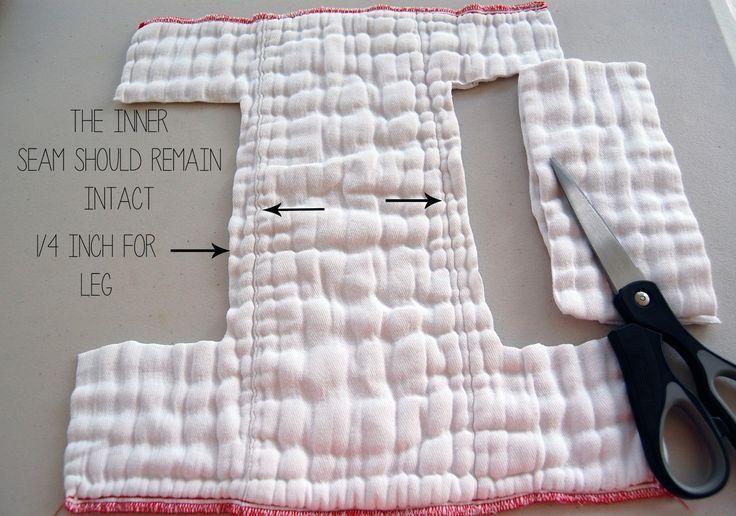
Sewing Your DIY Cloth Diaper
Follow these basic steps to sew your DIY cloth diaper:
- Sew the absorbent layers: Stitch together the inner absorbent layers, leaving an opening for turning and stuffing the diaper.
- Attach the waterproof barrier: Sew the waterproof material to the outer fabric, ensuring the shiny side faces the fabric.
- Combine the layers: Place the outer layer and inner layer right sides together and sew around the edges, leaving an opening for turning.
- Add the elastic: Thread the elastic through the designated channels and secure the ends.
- Attach the closures: Sew on hook and loop or snaps according to the pattern’s instructions.
- Finish the diaper: Turn the diaper right side out, close the opening, and topstitch around the edges for a polished look.
Benefits of DIY Cloth Diapers
- Environmentally friendly: Cloth diapers produce less waste and require fewer natural resources than disposable diapers.
- Cost-effective: Save money by reusing cloth diapers instead of continuously buying disposables.
- Customizable: Choose fabrics, colors, and patterns that suit your style and preferences.
- Comfortable and gentle on baby’s skin: Cloth diapers are typically made of softer, more natural materials that are less likely to cause irritation.
- Easily adjustable: Many cloth diaper patterns are designed to grow with your baby, allowing for a more customized fit.
Caring for Your DIY Cloth Diapers
Proper care is essential for maintaining the effectiveness and longevity of your DIY cloth diapers. Here are some tips to keep them in tip-top shape:
- Wash new cloth diapers several times before use to increase absorbency.
- Store dirty diapers in a waterproof, odor-resistant bag or pail until laundering.
- Use a gentle, fragrance-free detergent to prevent irritation and residue build-up.
- Avoid using fabric softeners, as they can reduce absorbency.
- Line dry or tumble dry on low to medium heat to preserve the integrity of the materials.
Wrapping It Up
Embracing DIY cloth diapers is a fantastic way to reduce your environmental footprint, save money, and provide a comfortable and customizable diapering solution for your baby. With a variety of patterns, materials, and sewing techniques to choose from, you can create the perfect reusable diaper for your little one.
Frequently Asked Questions
1. Can I use old clothes or towels for the absorbent layers of the cloth diaper?
Yes, repurposing old clothes or towels can be an economical and eco-friendly option for the absorbent layers. Just make sure they’re clean and in good condition.
2. How many DIY cloth diapers do I need?
The number of cloth diapers needed depends on your baby’s age and how often you plan to do laundry. On average, 24-36 diapers are recommended for full-time cloth diapering.
3. How often should I change my baby’s cloth diaper?
It’s best to change your baby’s cloth diaper every 2-3 hours during the day and as needed during the night to prevent leaks and skin irritation.
4. Can I use a DIY cloth diaper with a diaper cover?
Yes, if you prefer, you can use a separate waterproof diaper cover over your DIY cloth diaper for added leak protection.
5. How long will a DIY cloth diaper last?
With proper care, a well-constructed cloth diaper can last for several years or even through multiple children.
Add Comment